[안드로이드] 테이블 레이아웃(TableLayout)
0.
우리는 안드로이드에서 대표적인 레이아웃인 LinearLayout, RelativeLayout, ConstrainLayout을 활용해서 다양한 화면을 만들 수 있습니다.
하지만 특정한 모양의 레이아웃이 제공된다면 더 쉽게 만들 수 있겠죠?
이번에는 테이블 형태의 모양을 제공해주는 테이블 레이아웃에 대해서 알아보도록 하겠습니다.
1. 구조
테이블 레이아웃의 구조는 다음과 같습니다.
1
2
3
4
5
| <TableLayout>
<TableRow></TableRow>
<TableRow></TableRow>
...
</TableLayout>
|
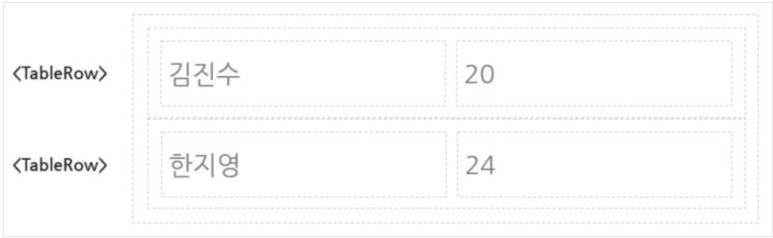
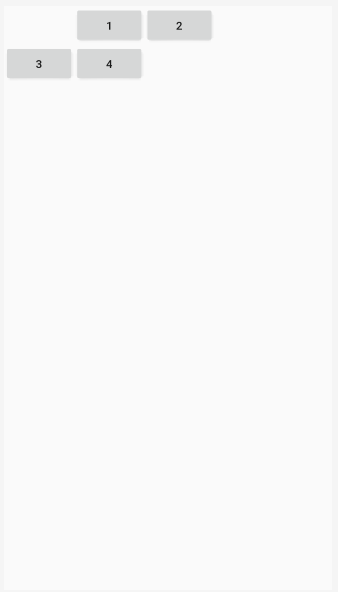
TableLayout으로 전체를 감싸고 그 안에 한 행(row)이 TableRow가 됩니다.
그리고 그 행안에 필요한 위젯들을 추가해줍니다.
2. 속성
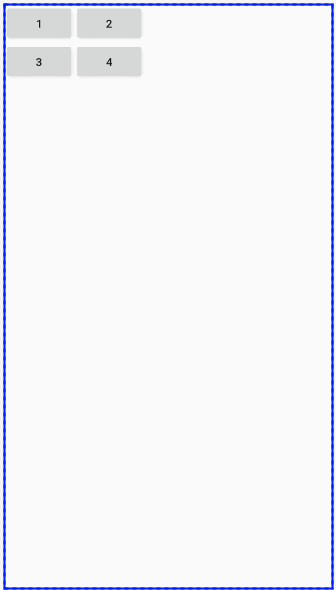
속성에 대해 설명하기에 앞서 기본적으로 테이블 레이아웃을 구성하고, 속성을 하나씩 추가해가면서 변화하는 모습으로 설명을 드리겠습니다.
1
2
3
4
5
6
7
8
9
10
11
12
13
14
15
16
17
18
19
20
21
22
23
24
25
26
27
28
29
30
31
| <?xml version="1.0" encoding="utf-8"?>
<TableLayout
xmlns:android="http://schemas.android.com/apk/res/android"
android:layout_width="match_parent"
android:layout_height="match_parent">
<TableRow
android:layout_width="match_parent"
android:layout_height="match_parent">
<Button
android:text="1"
android:layout_height="wrap_content"
android:layout_width="wrap_content"/>
<Button
android:text="2"
android:layout_height="wrap_content"
android:layout_width="wrap_content"/>
</TableRow>
<TableRow android:layout_width="match_parent"
android:layout_height="match_parent">
<Button
android:text="3"
android:layout_height="wrap_content"
android:layout_width="wrap_content"/>
<Button
android:text="4"
android:layout_height="wrap_content"
android:layout_width="wrap_content"/>
</TableRow>
</TableLayout>
|
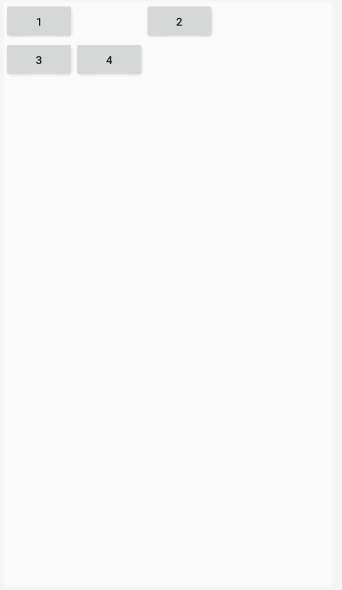
2.1 테이블 레이아웃 속성(TableLayout Attribute)
영상에서는 stretchColumns에 대한 속성만 언급이 되어있지만, 안드로이드 공식문서에 보면 이것 외에 두가지 속성이 더 있습니다.
collapseColumns / shrinkColumns / stretchColumns
테이블 레이아웃에는 위와 같이 세 가지 속성을 지정할 수 있습니다.
세 가지 모두 값으로 열(column)의 인덱스 값을 받습니다.
2.1.1 collapseColumns
collapseColumns는 지정한 열을 없애줍니다.
테이블 레이아웃 태그에 collapseColumns 속성으로 0 인덱스를 지정했습니다.
1
2
3
4
5
| <TableLayout
android:collapseColumns="0"
xmlns:android="http://schemas.android.com/apk/res/android"
android:layout_width="match_parent"
android:layout_height="match_parent">
|

첫번째 열이 사라진 것을 볼 수 있습니다.
속성의 값으로 여러 개의 열을 지정할 수 있습니다.
콤마(‘,’)로 구분을 해줍니다.
1
2
3
4
5
| <TableLayout
android:collapseColumns="0, 1"
xmlns:android="http://schemas.android.com/apk/res/android"
android:layout_width="match_parent"
android:layout_height="match_parent">
|

속성 값이 테이블 열의 인덱스 값을 벗어나게 되면, 무시하게 됩니다.
2.1.2 shrinkColumns
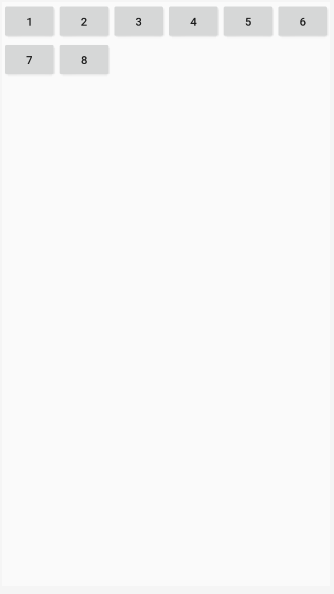
shrinkColumns는 지정한 열을 축소해줍니다.
shrinkColumns의 경우 화면을 벗어날 경우 해당 인덱스를 축소시켜주는 것이기 때문에, 기본 레이아웃에 버튼을 여러개 더 추가한 상태에서 설명드리도록 하겠습니다.
테이블 레이아웃 태그에 shrinkColumns 속성으로 0 인덱스를 지정했습니다.
1
2
3
4
5
| <TableLayout
xmlns:android="http://schemas.android.com/apk/res/android"
android:shrinkColumns="0"
android:layout_width="match_parent"
android:layout_height="match_parent">
|
첫번째 열에 있는 버튼이 사라진 것처럼 보입니다.
1~5열에 있는 버튼들의 크기가 아직도 화면을 벗어나 있기 때문입니다.
여러개의 속성을 지정해보겠습니다.
1
2
3
4
5
| <TableLayout
xmlns:android="http://schemas.android.com/apk/res/android"
android:shrinkColumns="0, 1, 2"
android:layout_width="match_parent"
android:layout_height="match_parent">
|
지정된 인덱스에 해당되는 열이 축소된 것을 볼 수 있습니다.
모든 열에 똑같이 지정하고 싶을 때는 ‘*‘을 넣어주면 됩니다.
1
2
3
4
5
| <TableLayout
xmlns:android="http://schemas.android.com/apk/res/android"
android:shrinkColumns="*"
android:layout_width="match_parent"
android:layout_height="match_parent">
|
모든 열이 화면에 맞게 축소된 것을 볼 수 있습니다.
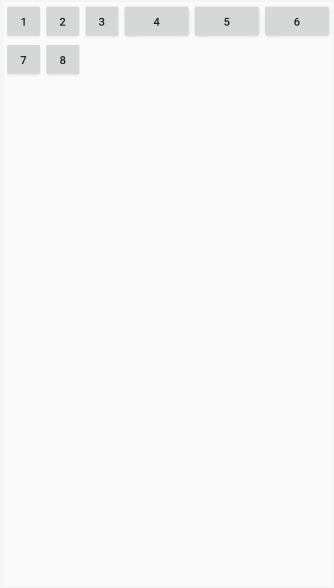
2.1.3 stretchColumns
stretchColumns는 지정한 열을 늘려줍니다.
테이블 레이아웃 태그에 stretchColumns 속성으로 0 인덱스를 지정했습니다.
1
2
3
4
5
| <TableLayout
xmlns:android="http://schemas.android.com/apk/res/android"
android:stretchColumns="0"
android:layout_width="match_parent"
android:layout_height="match_parent">
|
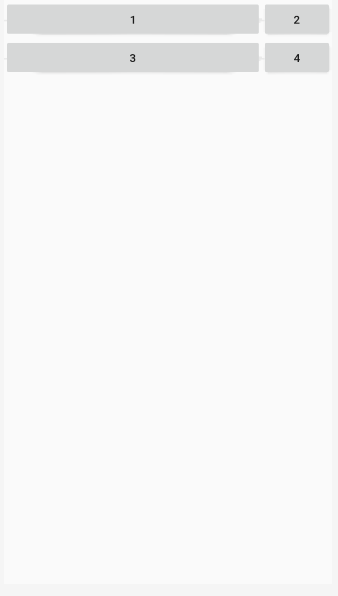
해당하는 열이 화면에 맞게 늘어나는 것을 볼 수 있습니다.
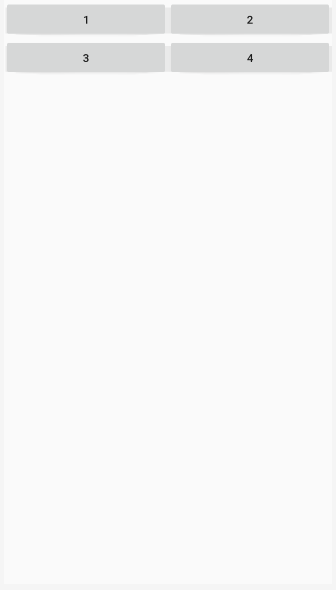
다른 속성과 마찬가지로 여러 개의 열을 지정할 수 있고,
shrink 속성과 마찬가지로 모든 열에 지정하고 싶을 때는 ‘*‘을 넣어줍니다.
1
2
3
4
5
| <TableLayout
xmlns:android="http://schemas.android.com/apk/res/android"
android:stretchColumns="*"
android:layout_width="match_parent"
android:layout_height="match_parent">
|
2.2 테이블레이아웃 내 위젯 속성
테이블 레이아웃 내에 위치한 위젯들에는 layout_column이란 속성을 지정할 수 있습니다.
layout_column의 값은 마찬가지로 열(column)의 인덱스 값이고 해당하는 인덱스에 위치하게 됩니다.
하지만 주의할 사항이 있습니다.
순서상 앞에 있는 위젯의 열의 위치를 뒤로 옮기면 뒤에 있던 위젯들은 그대로 따라서 뒤로 옮겨지게 됩니다.
즉, 뒤에 있는 위젯에 인덱스 값을 다른 위젯의 앞의 값으로 변경하여도 적용되지 않습니다.
2번 버튼을 3번째 열(인덱스 값=2)로 옮겨보도록 하겠습니다.
1
2
3
4
5
| <Button
android:layout_column="2"
android:text="2"
android:layout_height="wrap_content"
android:layout_width="wrap_content"/>
|
2열에 있던 2번 버튼이 3열로 잘 옮겨졌습니다.
그러면 1번 버튼을 2열(1번 인덱스)로 옮기고, 2번 버튼을 1열(0번 인덱스)로 지정을 해보겠습니다.
1
2
3
4
5
6
7
8
9
10
| <Button
android:layout_column="1"
android:text="1"
android:layout_height="wrap_content"
android:layout_width="wrap_content"/>
<Button
android:layout_column="0"
android:text="2"
android:layout_height="wrap_content"
android:layout_width="wrap_content"/>
|
1번 버튼은 잘 옮겨졌지만, 2번 버튼은 제대로 동작하지 않습니다.
순서상 1번 버튼이 앞에 있어서 그런 것 같습니다.
3. 생각해보기

A) 유지 보수에 더 불편함이 많을 것 같다.
테이블 레이아웃에서 제공되는 속성들을 활용하여서 모양을 잡기가 훨씬 편리하다.
리니어 레이아웃으로 구성을 한다면, 각 행 마다 수정을 해줘야한다.
감사합니다.
레퍼런스
[#부스트코스][ref-url-1]